Friday, July 26, 2019

July 14-25

Hi All,

We've done the finishing work on the teardrop and will be taking it out camping this weekend!  We got the teardrop shell mounted on the trailer, installed the doors, kitchen hatch, and vent, and are ready to roll.  We'll post pictures of the teardrop in action soon - keep checking back!

-Kelly


Pulling the trailer out so that we can mount the teardrop!

The kitchen is at a great height


View of the inside


Adding the rubber gasket to help seal the kitchen and keep it watertight

The kitchen hatch has foam tape around the edge where it will meet the gasket

Fitting the windows into the doors

Windows have been installed with sealant and drilled into the doors
Kitchen hatch has been installed!
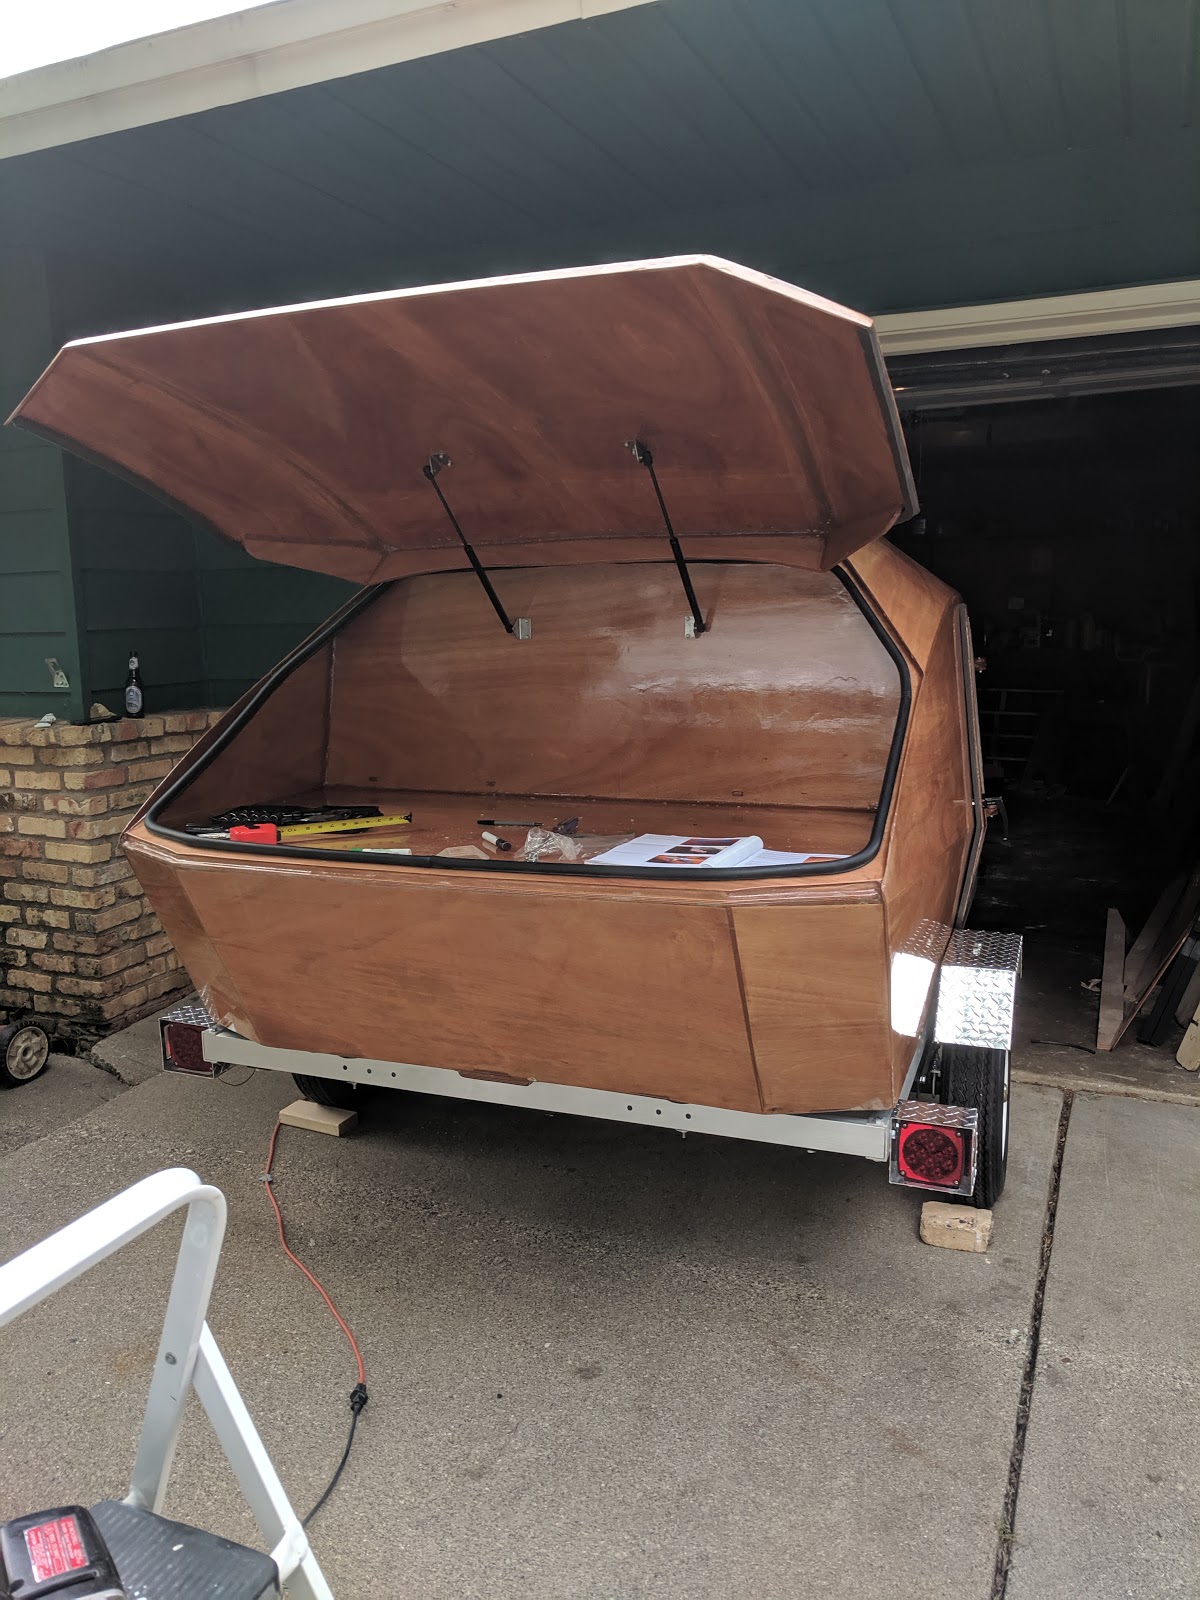
The gas struts hold the hatch open 
Doors have been installed!


Our queen size mattress fits perfectly

Here's a view of the vent from the inside.  We haven't hooked it up to power yet.

A lock is installed to keep the hatch closed tight

Trying out our new canopy.  Bugs won't get in our kitchen, and rain won't get into the food!

Took the teardrop on a test drive


Friday, July 5, 2019

May - July 2019

Hello all-

The teardrop is close to being complete!  Since the end of May we've gotten the doors assembled and epoxied, cut out holes in the teardrop shell for the vent and hinges, cleaned up the kitchen area and finished the hatch, and assembled the trailer the teardrop will be mounted on.  We're getting really excited to be in the final stages of this project and to take it out on the road!!  Take a look at the photos below to see different parts of the process.

Teardrop is upside down; vent hatch is being cleaned up & epoxied
Attaching the window sill to the window frame with epoxy/cell-o-fill glue

Cleaning up kitchen hatch; removing the blue piece that previously helped keep the edge stiff
Using fillet on the kitchen hatch for more solid connections and strength
Using epoxy/cell-o-fill glue to attach the door stiffeners.  This will keep the doors angled correctly in the oddly shaped wall of the teardrop.

Attaching the final stiffener to the kitchen hatch.  This pieces is along the edge that will be connected to the teardrop via hinges.
Using fillet to assemble the door frames that attach to the inside of the teardrop
Cleaned up the kitchen
New layer of epoxy in the kitchen - nice and shiny!
Cody cutting some boards to make risers to set the teardrop on

Risers are ready to be used
Doors and kitchen have been epoxied and are looking great!

When small bubbles appear under the fiberglass/epoxy layer, we end up with these small patches that don't look too great.  To help get rid of these, we dabbed small amounts of epoxy over the patches, smoothed them out, then sanded them later to make the top layer nice and even.

To cut out the holes for the hinges, Cody began by using a drill to break through the hardened epoxy, then I used a triangular file to get rid of the rest

Here's an example of one of the hinges.  These were coated with fiberglass and epoxy, so now we have to file and sand down the edges to get rid of the overlapping fiberglass tape
The hinge holes on the kitchen hatch were tricky to get at because there was a board directly below these holes.  Cody was very careful as he chipped out small bits of epoxy without damaging the board below.

Here is a hinge and how it will slot into the teardrop shell.
We got the door to fit onto the teardrop shell with the hinges!!
Here the door is swung open
We were able to attach the kitchen hatch to the teardrop shell with hinges as well


It's looking more and more like a camper!
We attached the inner door frame to both sides with epoxy cell-o-fill glue and clamped them in place to dry over night.

Here's a view from the inside of the teardrop

The teardrop shell was set on top of the trailer to make sure everything aligns correctly.

A coat of sealant was added to the bottom of the teardrop so that it would be safe from water and rocks getting kicked up on the road
The trailer lights are getting hooked up
The hole for the vent has been cut out and sanded smooth


A spacer has been glued to the underside of the vent cut-out. 


Wednesday, May 29, 2019

Back to Work in 2019

Hi everyone!

It's been a long time since our last post.  We made a lot of progress while we were both busy with work and school in the late summer and early fall of 2018, then had to put the teardrop on hold while the temps were too low to use epoxy.  Now that spring has sprung in Minnesota we're back at it and excited to get this project finished!

There was so much that happened between our last post and when we took our winter break from building, so feel free to flip through the photos - hopefully the captions will give you a good idea of what we were doing.  I'll be updating you all again with our recent progress in the next couple of days.

-Kelly
Teardrop shell complete!
Laying fiberglass across the top


We used epoxy on the fiberglass and sanded the sides before applying fiberglass there

All shiny!
Fiberglass on the gutter that will help keep water out of the kitchen


Painting on a layer of epoxy to the teardrop shell

Putting the hatch together with fillet.  This will eventually have a vent/fan installed into it on top of the teardrop.

Fiberglass on the top hatch

The kitchen area has been cut out and the gutters are installed

The hatch base has been installed with fillet

Doors are cut out!

View from the inside - the open space under the kitchen will get closed up now that the doors are cut out.

Fiberglass and epoxy have been added to the top hatch

The kitchen gutter required a few clamps to get the fillet nice and secure

We flipped the teardrop upside down!  Attaching the bottom of the teardrop was the last thing we worked on in 2018.